
Badlands Fieldcraft: Land Navigation Skills and Techniques, Part 2
In part 1 I went over the major and minor terrain features and how to identify them in person and on a topographical map. This is an important skill to have for land navigation and I’d really suggest studying it.
In this article I’d like to build upon that and detail some useful techniques you can employ to help plan your route and stay oriented while navigating. We will be practicing these extensively at the Fieldcraft Course, so be sure to check the calendar if you’re interested.
Backstop
Just like the backboard on a basketball hoop, a backstop is simply a linear feature perpendicular to your route of travel and on the back side of your destination. This can be a road, river, ridge line, or any other linear feature on the map. We would use a back stop to let us know that we’ve overshot our destination. For instance, if we are traveling back to our camp which is a hundred meters off a road, we will know we missed the mark if we end up at the road.
Offset Aiming

Offset aiming is used in conjunction with a backstop. We use it when we want to intentionally hit our backstop on a particular side of our objective. We might do this to intentionally compensate for our own lateral drift. Let’s say we know we are going to drift left because it’s dark, we’re tired, and we’re on a slope that drops to our left. Our camp is 100M off a road that is serving as our backstop. By intentionally aiming to the left, we now know what direction to turn when we hit our backstop to find our way back to camp (right in this case). Rather than assume we are going to follow a perfect line back to our camp and risk missing it, hitting our backstop and not knowing which way camp is, we intentionally miss it in a direction of our choosing so we can find camp easier.
Handrail
Hand railing is a technique we use when we want to follow a linear terrain feature. It’s not very tactical to actually walk down a road, but if the road happens to go where we want to and we want to utilize it as a guide, we can parallel it from a distance. This allows us to move quickly until we get to a point where we don’t want to parallel the road anymore.
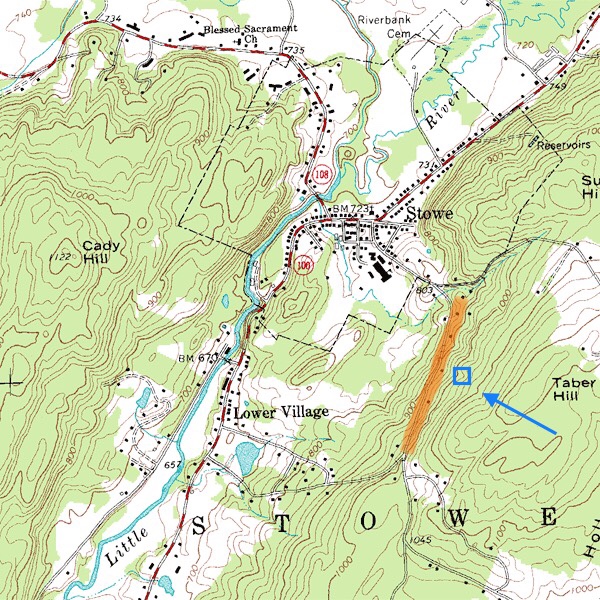
Attack points

Attack points are easily identifiable features that if we can get to them, we can shoot an azimuth from them to our objective. For instance, let’s say you have to cross a swamp in the dark to get to your objective. It will be very difficult to keep track of where you are. Let’s say on the other side of this swamp there is a hill. If you can determine ahead of time what the azimuth from the hill to your objective is, as long as you get to the hill you can locate the objective.
Escape Azimuth

Escape azimuths are an azimuth that you can use anywhere is your AO in an emergency to find a linear terrain feature where you can expect to be rescued. Just walk in that direction until you hit the feature. This would be something you would organize prior to heading out in your planning.
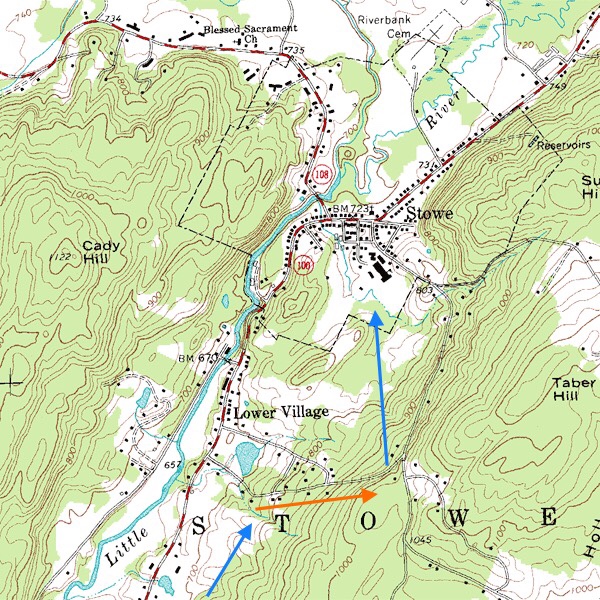
Intersections

Intersection is a technique to locate a point on the map. Let’s say you have a building that isn’t shown on your map, but you want to be able to relay the grid coordinates of the building. You’re going to need to get to a known point and shoot an azimuth to the building. Then you will need to get to another known point and do the same. When you plot these azimuths on your map, the intersection they create will be the buildings position. The more azimuths you can shoot the more accurate this technique is.
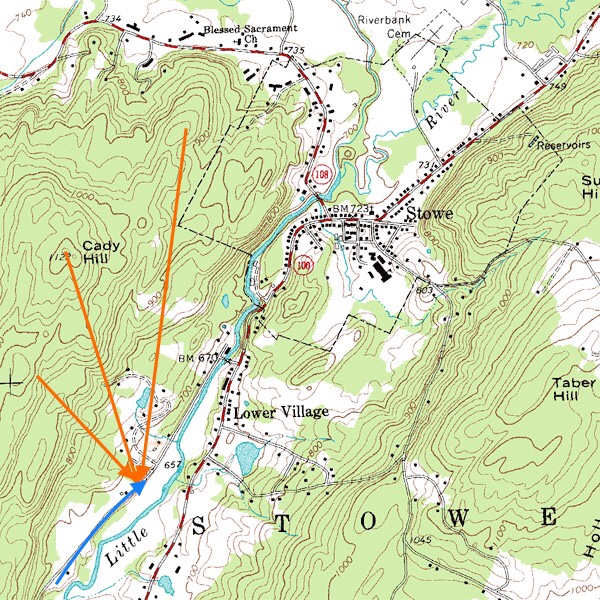
Resection

The final technique is resection. Resection is used to locate your position on the map. You’ll need to shoot at least two azimuths to known points, then plot their back azimuths on your map. Where these lines intersect is your position. Of course adding more azimuths will make this technique more accurate as well.
If you’re traveling along a linear terrain feature you can also do what is called a modified resection to locate your position on the feature. You’ll need at least one known point. Shoot an azimuth to it, then plot the back azimuth on the map until it intersects with the feature you are on. Use three separate features for the most accurate result.
So there you have it, some great tools to have in your land navigation tool box. You can use all these to help plan your routes before you leave, or to help you keep track of where you are once you get into the bush.
Share This Story, Choose Your Platform!

About the Author: NC Scout
6 Comments
Comments are closed.

Related Posts


GUNS N GEAR


This morning I found out that WordPress has unsubscribed me from multiple blogs, including this site. I’m not seeing where I can sign up again. Can you direct me to the link?
https://www.americanpartisan.org/comment-policy/
scroll to 4:30 min mark—https://www.youtube.com/watch?v=jiipaN5iXXY
If the guy you’re learning land nav from doesn’t know the difference between an azimuth, a heading, or a bearing I’d be cautious. That’s the problem with this world, too many “YouTube know it all’s” and too many “never done it’s” sharing their videos passing bad information to unsuspecting people.
Many times people use the terms interchangeably. “Bearing,” is no longer used as it leads to mistakes. instead of saying S 05 W, it’s better to say 185. Azimuth is simply a direction expressed by an angle from north. The heading is just the direction you are moving. We use the term bearing to denote the direction to or away from an object.
The Army likes to make things a bit more complex than it needs to be. A resection and intersection are actually the same thing. For a Surveyor, a resection is performed by take the angles between 3 known points and computing the directions from that data to get the bearings you need to perform the intersection. Identifying terrain in terms of the 5 basic land forms is a good thing to borrow from the Army. I’ve used them in teaching map reading in my Surveying and hydrology classes.
Thanks for your input on azimuth, bearing and heading. Once again they are not the same things and shouldn’t be used as such. While I’m not a surveyor, when it comes to land navigation with a map and compass, intersection and resection are most definitely not the same things and are used for two very different reasons.