
Improving the Type 81 Chest Rig Part II
I want to give a short write up on a few more modifications to the Type 81 chest rig that are easy and inexpensive to make at home. I posted an article on adding better shoulder straps to the Type 81 a few months ago to improve the comfort and fit. After using mine for a while, I decided that I wanted a better way to attach a radio pouch, rather than sticking my Baofeng in the grenade pocket, where it tended to fall out. I have been trying out the Condor MA56 HHR pouch, and have been really happy with it and how well the UV-5R fits when using the stock battery. NOTE- the UV5R will NOT fit in this pouch with the extended battery. Like most Condor gear, it isn’t top of the line, but is serviceable, and at approximately ten dollars, it is a perfect radio pouch to pair with a Type 81. In order to attach this pouch, I needed to add a couple of rows of MOLLE webbing to the sides of the Type 81, and remove the grenade pouches, which I personally find almost useless. The other thing I don’t particularly care for on the type 81 are the wooden toggle closures for the mag pockets- sure, they work, but they aren’t the most durable thing in the world, and I find them extremely hard to manipulate with gloved hands, or in the cold. To remedy this, I removed the toggle closures and added fastex buckles. Let’s take a look at how to make these two changes.

For the MOLLE webbing, I started by removing the grenade pouch off of each side. I used one of the small blades on the Case pocketknife I carry to cut the stitching on 3 sides, and then cut the fabric on the side of the pouch to remove it, as shown in the picture above. You could use a seam ripper, exacto knife, razor blade, etc. to do the same, just be sure not to cut the canvas on the chest rig itself, or the mag pouches.
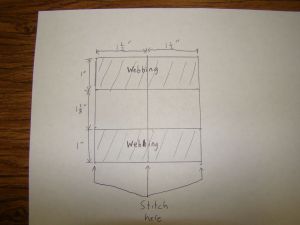
Next, I used a ruler and an ink pen to draw the grid on the sides of the chest rig, just like what is shown on paper in the picture above (minus the dimensions and notations). I wanted two rows of MOLLE, each one two slots wide, and this is about all you will be able to fit on the Type 81. The slots should be 1 ½” wide in the horizontal direction, and the webbing should have 1” or a tiny bit more between each row of webbing vertically, and you will be using 1” webbing. I drew a grid on each side of the chest rig with a vertical line ½” from the mag pouch, another one 2” from the mag pouch, and another 3 ½” from the mag pouch. These will be the lines where you do your stitching. I then made four horizontal lines- from the bottom, one of them is at 0″ (from whatever point you are using as your baseline), one at 1” another at 2 1/8” and the last one at 3 1/8” This should leave you with a grid similar to what is in the picture above.

Once the grid is drawn, I cut 4 pieces of mil spec 1” nylon webbing (you can get this on eBay, don’t use craft store nylon webbing, it doesn’t work as well and is not as durable) with each one being 4” long, so that I would have 1/2″ extra on each side to run an extra row of stitching on each end to tie the ends down. Also, melt each webbing end with a lighter so they don’t unravel. Lay the two pieces of webbing down on your grid as shown in the picture, sew across the webbing on each vertical line, and then run one more row of stitching over each end of the webbing to secure it and prevent fraying. When you are finished it should look something like what is shown in the picture. As a side note- please ignore my less than picture perfect sewing job, I was not blessed with wonderful sewing skills, as you can plainly see. Once you have sewn each side down, you should have functional MOLLE webbing on each side. If you mess up, just cut your stitching, remove the webbing, and try again- I certainly didn’t get mine right on the first try. Also, any time you’re sewing something like this, use nylon upholstery thread rather than cotton general purpose thread, it is MUCH more durable, even though your sewing machine may not like it, if you’re using a sewing machine.

For the next modification, the fastex buckles, you will need some surface mount fastex buckles. These are the ones I used. Start by carefully cutting off the wooden toggles and the corresponding loops, so that the pouches and flaps look like what is shown above.

Next, use the female side of the buckle to trace where it will go, mark the holes where the prongs for the buckle backing piece will go, and use a small knife or soldering iron to put holes through the sides of each magazine pouch for the prongs to go through. It will be obvious how to do this once you spend some time examining the buckle pieces in person. Insert the backing piece, snap the female side of the buckle on, making sure to get it tight- I use a pair of padded pliers to snap them together as tight as possible. I also like to put a touch of super glue around each prong to keep the fabric from fraying, or the buckle from separating. If you ever need to replace it, you can still break the buckle and remove it. Note– these buckles can and do sometimes break, they are plastic after all. Go ahead and buy some extras, they’re cheap and easy to store.

Once this is done, cut 4 pieces of your 1” mil spec webbing, each one approximately 6” long. Loop each piece of the webbing through a male side of a fastex buckle, and sew them on as shown, making sure that you sew them on with correct placement so the flaps will still buckle over a magazine, without being too loose. Again, my sewing skills leave much to be desired, as do the capabilities of my sewing machine, but if you do this carefully, you should end up with a Type 81 chest rig with functional fastex buckles.

One other small thing you might want to do to the inside of each mag pouch is stitch or glue a small piece of felt or canvas to the backing for the buckle that is inside each mag pouch- the plastic piece can rattle against the magazines on some Type 81’s if the pouches are a little oversized. The felt will prevent any rattling that might would occur. I just take a small square of good quality wool felt and put one or two stitches on each corner with a hand needle. I do this for each pouch.
There are other ways to add buckles to a type 81 that would probably be a little nicer, but this is a quick, simple, and inexpensive way to do so, and with minimal supplies or tools- it took me under an hour using scissors, a pocketknife, a Bic lighter, and my wife’s Brother sewing machine. The beauty of the Type 81 is that they are still inexpensive, and they are easy to customize and modify. Similar modifications could be made to any of the other Chinese chest rigs such as the Type 56, or the Type 85 for submachinegun magazines. I hope this proves useful for someone, and if you have any comments, questions, or suggestions, please comment!
Share This Story, Choose Your Platform!

About the Author: wwes
5 Comments
Comments are closed.

Related Posts


Howitzer Clothing – Code AP15 for 15% OFF


CIVIL DEFENSE MANUAL – Only $56.29 This Month!


GUNS N GEAR


Nicely done
Thank you!
NICE!
Thanks man!
5