
Lodestone Training and Consulting Sends: Shot Placement
This article comes to us from Lodestone Training and Consulting. I recently took a two day Low Light Rifle course there, and I cannot recommend the company enough. Great and knowledgeable Patriots. This one comes from a former Special Forces soldier and training instructor there.
As kind of a follow-up to the article I wrote on Dots and Marksmanship, I wanted to talk more on shot placement in a combat setting. What do I mean by combat? Any situation with a physical confrontation where there is potential injury or loss of life. This type of situation causes a surge of adrenaline (Fight or Flight response).
All kinds of things happen to your body physiologically, tunnel vision being one of the most common. When my wife used our Mossberg 590 to defend our home, she experienced “combat” just a real as I have executing missions in Iraq and other places.
I won’t repeat information from my earlier article. I’ll just assume you’ve read it. There is an interesting phenomenon that occurs with shooters as they go through the shoot house. I have seen it at every CQB class that I have helped to teach. It doesn’t matter if it’s Military, Law Enforcement or a Civilian type class. Combat, as those who have experienced it will attest, is sensory overload. As students are entering the room and scanning for threats, we give them all kinds of targets and other stimulus. What, generally, are they looking for? What are professionals all over the world looking for? Hands. As soon as the hands are identified as having or not having a weapon, the students will react as they are clearing the room.
With minds racing, and weapons identified, the students will begin to shoot to eliminate the threat. What tends to happen is that all the shots go toward the weapon and hands, not at the center of mass or head. This may not seem like a big deal, but it is. This needs to be noted by trainers and pointed out to students. We need to train to have good shot placement on threats.
Let me give you an example of what HAS happened. Gun fight: real world threat presents himself with an AK. Soldier identifies threat, sees AK, and immediately engages the threat. After shooting 5-6 rounds AND KNOWING that they were hits, the threat falls down. Soldier now ignores the fallen threat and starts looking for another. The old threat then rises and continues his original attack, minus the AK, catching the soldier completely off guard.
So, what happened? Was this a scene from The Walking Dead? All 5-6 of those rounds hit the old school, milled AK, effectively destroying it and knocking down the threat. Then, much to his surprise, Johnny bin Taliban realized that he wasn’t dead, just minor injuries to his hands, so with an “Inshallah” he continues the fight.
So, what to do? You need to train for real life. It all starts with MMS (Marksmanship). That’s why we use Dots to work on the fundamental principles of MMS. You need to know your weapon. You need to know your holds. You need to know where your rounds will impact if you are 3 feet, 30 meters, or 600 meters away. It’s not enough to just identify your target, you need to identify the threat and place well-aimed shots that will neutralize the threat. As I now find myself saying often in classes, I want you to be playing chess, while your opponent is playing checkers.
I can’t emphasize enough the importance of reviewing and practicing the basics of shooting. All of the Level One classes and about half of the days at Level Two classes start with three basic types of drills. The rounds per drill, and distance, are up to the individual situation.

This is a good place to also mention that for about half of the Level Two classes and all the Level Three LTAC classes, we start the day with a cold drill. Depending on the class, the drill can be quite stressful. This is a great way to check your current self as a shooter.
Back to the warm-up. First is shooting one single shot at a time. Each round should be treated as a standalone cycle. From target ID, presentation of the weapon, through the shot, and back to the starting position (high ready/low ready/holster/whatever). Take your time and do it right. Make sure you are getting hits where you desire.
Second is shooting controlled pairs. The emphasis here is on keeping a good sight picture before and after each shot, plus resetting the trigger.
Third is shooting strings of 3-6 rounds in a steady rhythm. 1-inch dot, 3-inch dot, 6-inch dot targets, the old RTG1, 2, and 3 targets or even index cards work great for these drills. You want something with a small, tight area for you to aim at. After these warm-up drills, there are plenty of different drills to help you to shoot increasingly faster while maintaining accuracy.
When you start training days with these warm-up drills, you are reinforcing the fundamentals of MMS. So, knowing your holds, you are getting rounds where you want them to be. Now, as you make the transition in your training to CMMS (Combat Marksmanship), you need to have the discipline to continue putting rounds where you want them.
A type of drill that I like to do, to help reinforce this is by using one of the old RTG 1, 2 or 3 targets. The instructor will call out numbers, shapes, or colors in combinations to keep the student’s/shooter’s mind occupied as they search for and identify the shape to engage. At some random point, an instructor will call out a “threat”. As soon as the student hears that prompt, no matter where they are in the current drill, they must ID and engage the human silhouette. Specifically, we want them to shoot center (at the center shape that is now representing the heart and lungs), ID and drive the gun to the head (specifically, the Cranial triangle), then ID and drive the gun to the pelvic girdle. The number of rounds per target can vary depending on the platform and circumstances. One of the main benefits of this drill and others like it is to force the shooter to lock on with his eyes and hit specific areas of the body or threat while under stress.
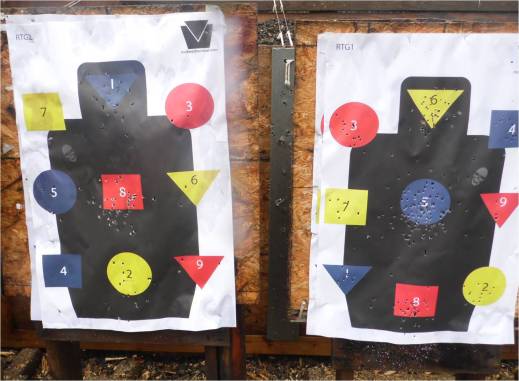
It is important to note that the shapes in these targets are not anatomically correct. That is by design. My intent for this type of drill is for the student to make the mental decision to shoot at a designated area. They are purposely IDing the spot, the shape on the target they intend to shoot with their eyes. They are then driving the sights to that point to take the needed shot. This then helps the shooter to be much more accurate once they get into the house, or real world.
One of the changes I have made over the past few years when using shoot/no-shoot targets, is to call any hit on a weapon as a miss. We need to force ourselves to become smarter shooters. Using the craw, walk, run method of training as students are going through the Sims/UTM house (walk phase) we sometimes will spray paint different areas of the target to help guide them as to where to place shots. We would do this especially if they are still putting hits on the weapons instead of a good center of mass shot or head shot.
As soon as it is the run phase (live-fire in the house) there should be no help given. It is up to the student to deal with the stress and perform. It is up to the instructors to call the shots as they really are, don’t let them get away with sloppiness. Make sure those hits are where they should be. After all, it is a matter of life and death. I don’t know about you, but I choose life.
With a progressive selection of drills, it will become second nature to place shots where we intend, not just in the general direction of the threat. Chess vs. Checkers.
Thanks for reading,
Jared
Jared started shooting when he was five when his Grandfather bought him a BBgun. He joined the army after 9/11 and served as an 11B in the 82nd airborne for 3 1/2 years. He has then spent the rest of his time in the SOF community both in 5th and 20th Special Forces Groups. He is an 18B and has trained thousands in the Military, Law Enforcement and good Citizens of this country. He owns Lodestone Training and Consulting which offers a wide variety of workshops and classes for everyone.

Share This Story, Choose Your Platform!

About the Author: Patriotman
One Comment
Comments are closed.

Related Posts


Howitzer Clothing – Code AP15 for 15% OFF


CIVIL DEFENSE MANUAL – Only $56.29 This Month!


GUNS N GEAR


5