
WYOMING SURVIVAL: Meshtastic Mesh Network Part 2
Originally published on Wyoming Survival. -NCS
In part one of Meshtastic Mesh Network I did miss a few things and wasn’t able to fully test the capabilities of this system. I ordered 2 more nodes and got them this week. I was able to do some more testing that needed to be done. Below you will see the results of my testing. Also I’ve included a definition of a Mesh Network to help anyone not understanding the concept of a mesh network.
What is a mesh network?
DEFINITION: “A mesh network is a network in which devices — or nodes — are linked together, branching off other devices or nodes. These networks are set up to efficiently route data between devices and clients. They help organizations provide a consistent connection throughout a physical space.
Mesh network topologies create multiple routes for information to travel among connected nodes. This approach increases the resilience of the network in case of a node or connection failure. Larger mesh networks may include multiple routers, switches and other devices, which operate as nodes. A mesh network can include hundreds of wireless mesh nodes, which allows it to span a large area.”
Full mesh vs. partial mesh topology
“In a full mesh network topology, each node is connected directly to all the other nodes. In a partial mesh topology, only some nodes connect directly to one another. In some cases, a node must go through another node to reach a third node.”

https://internetofthingsagenda.techtarget.com/definition/mesh-network-topology-mesh-network
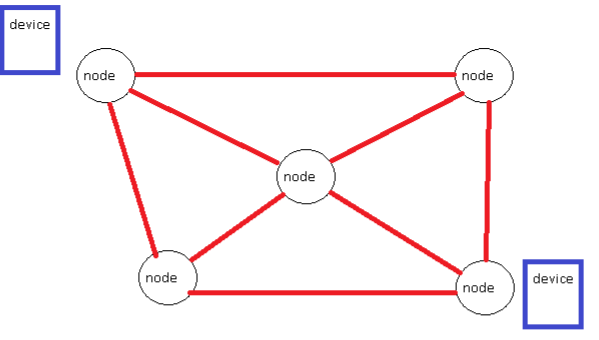
The picture below shows a possible setup of an area using the Meshtastic mesh network. Remember one node always has to be with the device it is connected to. So imagine having each node in the picture below about 2 miles apart and then a separate node connected to each device. That could easily give you a possibility of 8 mile(possibly even more distant than that. Keep reading) range of communication between the two device as long as each node can see the next node. What is also in the picture below is the line of communications between nodes. If the center node goes down for some reason the nodes should reroute the message to the other node to deliver it to the recipient of the message.
I have no way to really test this with only 4 nodes but that is the theory behind it. I can test the relay abilities of nodes in line with a device on each end at a distance to far for the two nodes on each end connected to the device to communicate.
After doing the initial testing of the Meshtastic nodes and not being able to pick them up easily with my SIGINT gear I was dwelling on how someone would be able to detect them.. then it hit me how simple it would be to detect them using Bluetooth on a common device.. I’m not sure why I didn’t think about that in the first set of tests I did. I turned on the node and with a device that was not linked to the node I started the Bluetooth scan for other devices. Sure enough there was the node. So now the question is how far away will the device pick up the node from. I started at 100 yards away. I slowly walked towards the node while the device kept scanning for it. At 30 yds it finally picked the node up. This was with a stock rubber ducky antenna not a high gain antenna. This tells me for the most part you would have to be almost on top of a node to know that kind of system was in use. If someone was able to find the node they could link it to their phone if they have the Meshtastic app and then get into your network. Once in your network they can see ALL messages from there on since Meshtastic app is a GROUP text message service. As long as they don’t change the name of the node you would never know they were monitoring your network. Also if they found the node but couldn’t add their device to it they can read the messages being sent on the screen as they are sent. Something to keep in mind while hiding your nodes around your area.
Ok now on to the relay testing with 3 nodes. First thing I did was raise the stock antenna of one node to 8ft at my house and ensured it was connected to a phone.
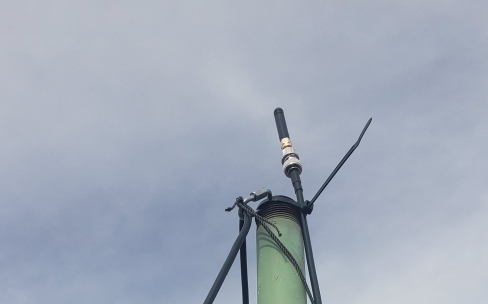
Next I took the relay node up the mountain 300+ft where it can see the node at the house and the area I was driving too. I taped the node to the top of a PVC pipe and slid it into my antenna sand bucket I made awhile back. I did my first test from the relay location to make sure it works.

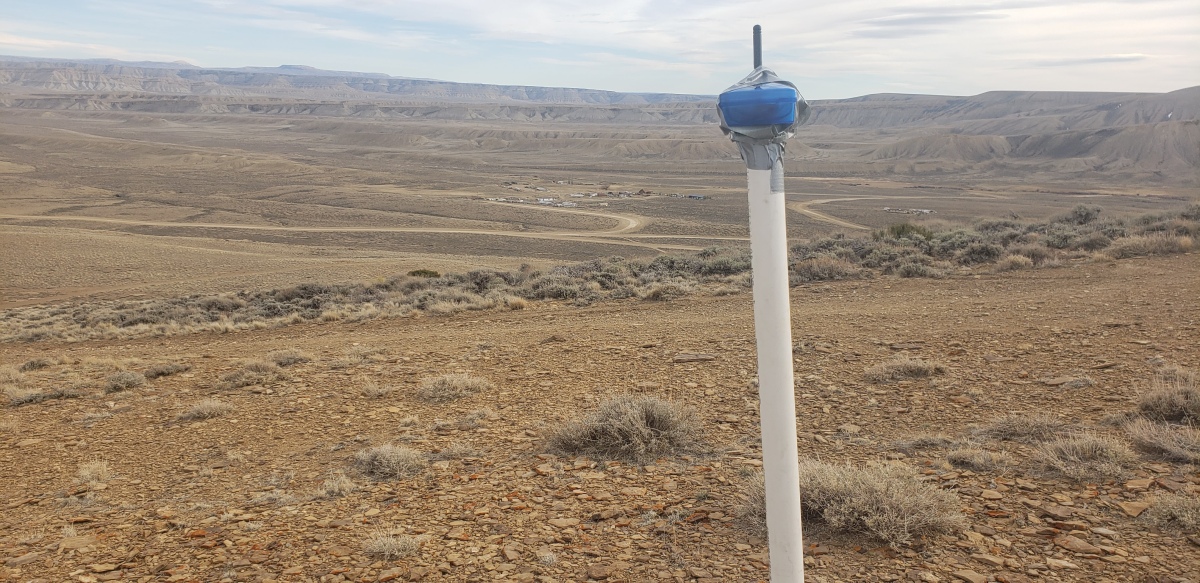

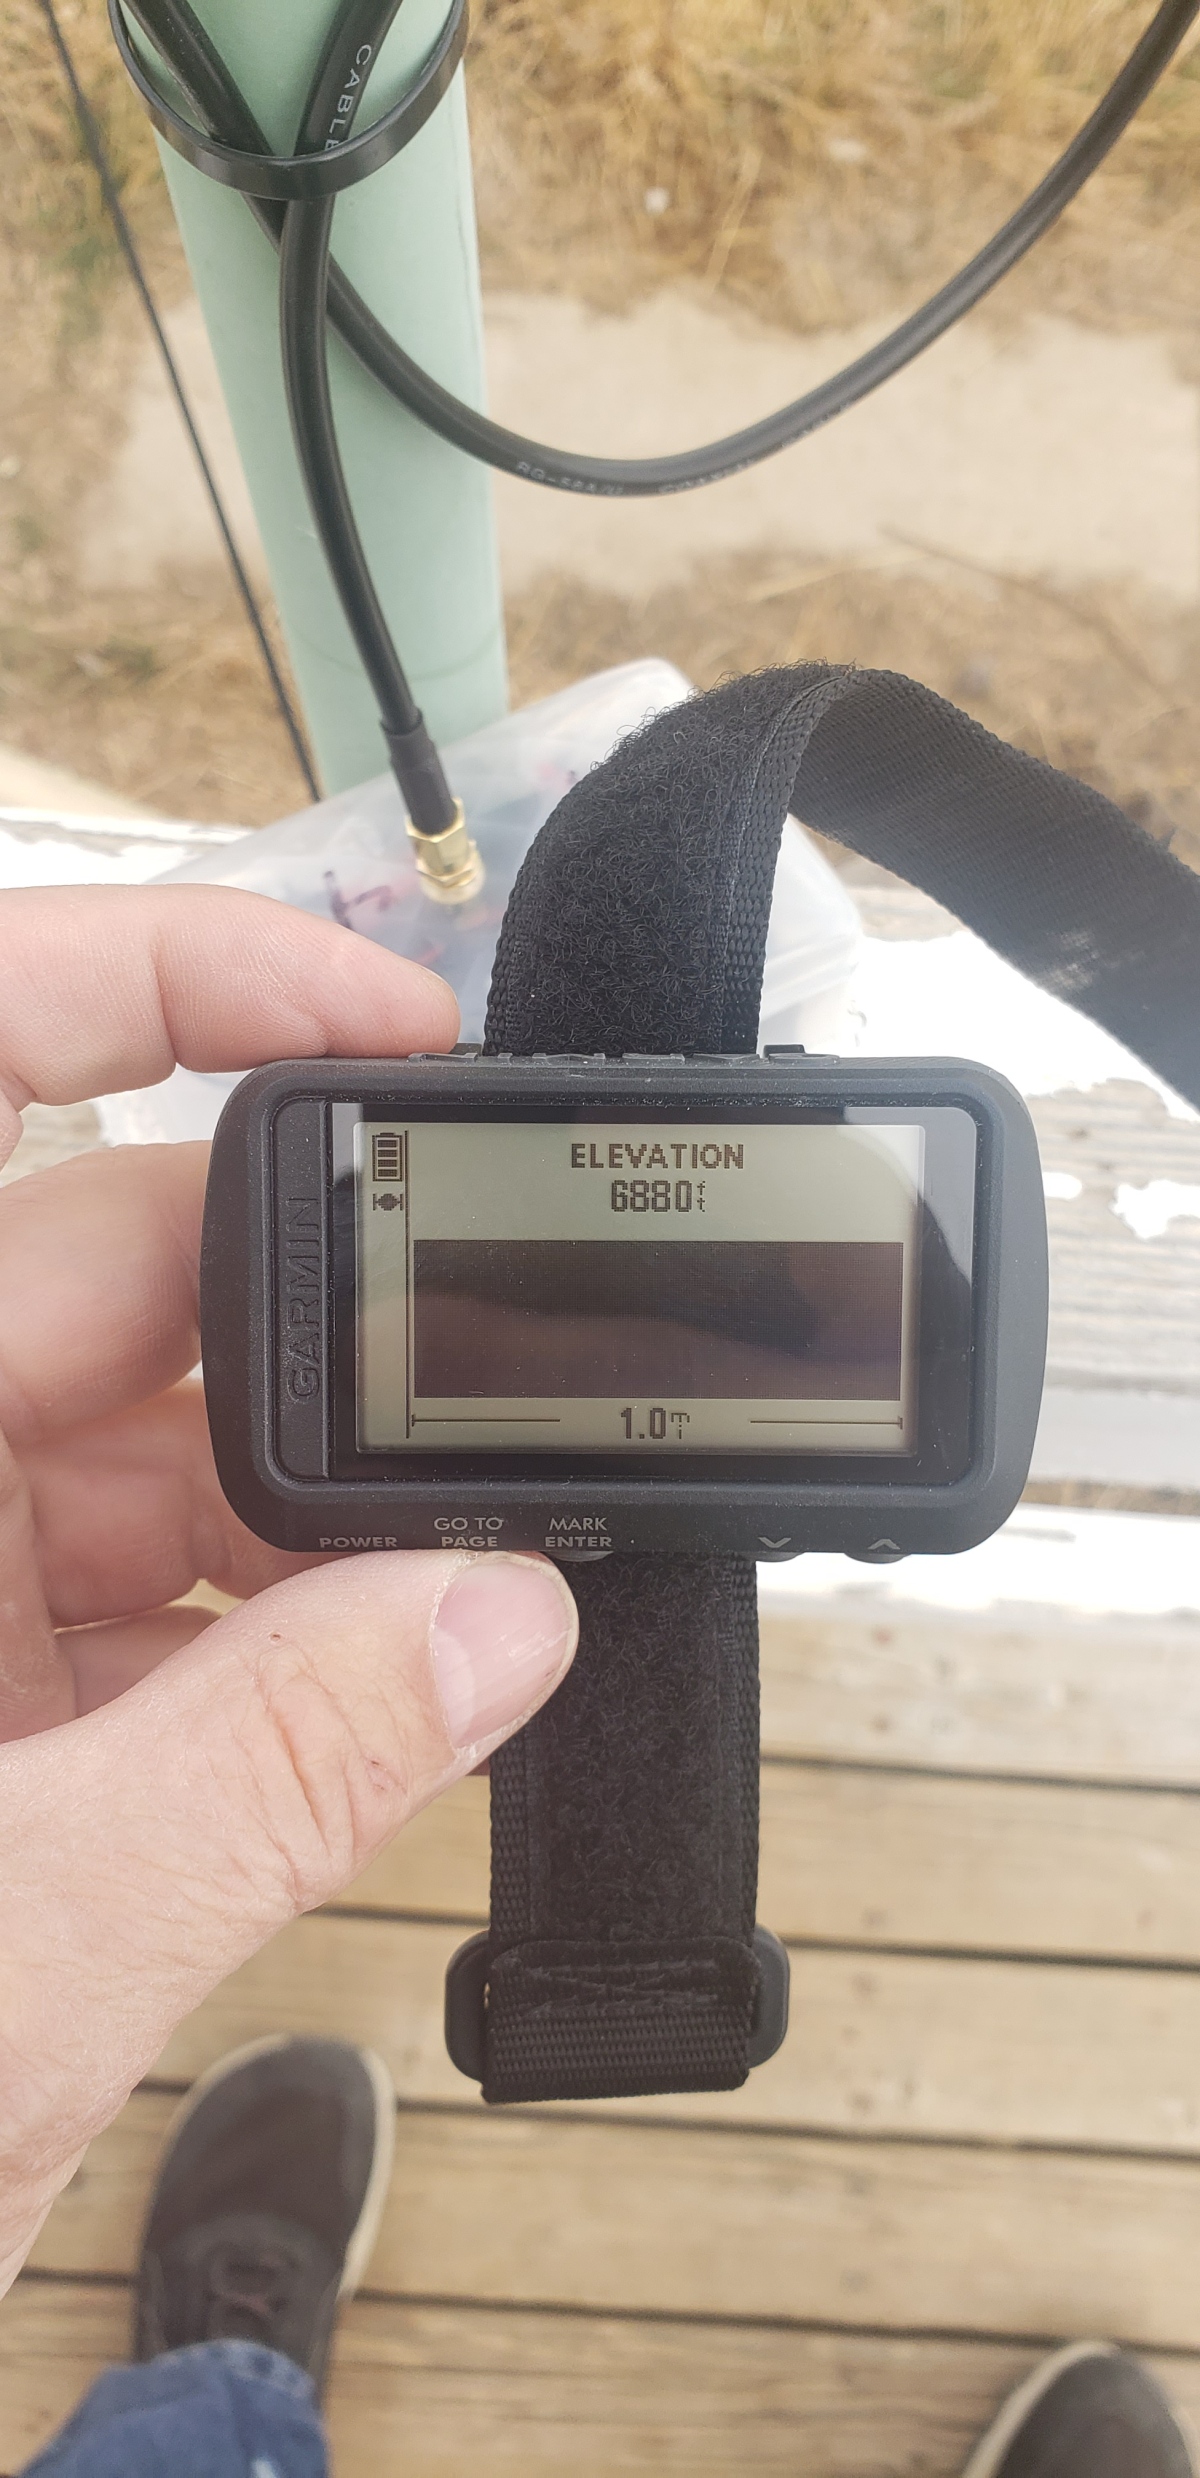
I started driving north towards I80 testing the nodes from different distances. The picture below shows the receiving device. As you can see I was able to make it 11 miles from the house and still get a message through using the relay. From the 11 mile mark to the relay was 10 miles so that makes LOS from one node to another at least 10 miles. Pretty impressive if you ask me.

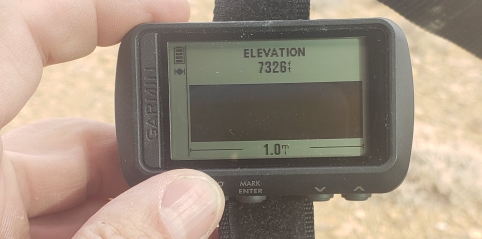
I tried a few different antennas at 11 miles and actually had the best luck with the stock antenna. I made a yagi for 903 MHZ but it still wouldn’t make contact. The stock antenna is the only antenna that made the contact as you can see on the picture below. The last 2 entries on the 2nd picture below are from me heading back towards the house sending messages after the nodes had been idle for 60 minutes or more.

My final thoughts on this are pretty much the same as before. I was highly impressed by the distance I got with LOS and the relay. I think this has multiple uses. I think having this anywhere you need comms in an area is a great off grid option. I don’t like the fact you cannot send DIRECT messages to someone on the network and that they goto everyone. That is a real security problem in my eyes. Also the fact if someone gets your node and links it to their phone you will never know if they don’t ever send any messages or change the name of the node. You will have to decide if these will work for you or not.
Share This Story, Choose Your Platform!

About the Author: NC Scout
7 Comments
Comments are closed.


Howitzer Clothing – Code AP15 for 15% OFF


CIVIL DEFENSE MANUAL – Only $56.29 This Month!


GUNS N GEAR


You can use encrypted here, https://meshtastic.org
Encryption
Messages are AES256 encrypted. Only radios supplied with your channel settings (which includes the key) should be able to read your messages. Using multichannel settings you can send encrypted messages on one channel and still participate in a default Meshtastic mesh.
And here, https://meshtastic.org/docs/software/settings/channel#set-encryption
I’m not sure I’m up for digging that much into the programming….haha it would probably never work again
I work for a WISP and we build large wireless networks in the 5Ghz range and with clear LOS, we’ve achieved 24 mi links with 3ft dishes. Once the network is built, then you can connect any kind network device on each end & pass data. We mainline on Ubiquiti equipment. I’ve personally set up some 900Mhz links & shot thru thick woods with no LOS & able to pass 20-30Mbps.
Have you considered using drones as a means to extend range?
This is a solid article worthy of more research.
https://meshtastic.org/docs/developers/device/encryption
The original point was low cost hardware for long range gps using map and messaging apps like meshtastic. Meshtastic will either use a flash tool or it’s software settings interface to it’s code – the flash tool is more likely proprietary for t-beam engineers while they may or may leave us with very limited access to the code settings through the familiar “System Settings” gui shell.
Meshtastic uses phone for map rendering and gps position for channel members and messaging. The t-beam (meshtastic pre-installed by manufacturer) is the hardware side for the LoRa and it’s firmware connected over bt and wifi to the client phone with meshtastic app.
So, if you have a t-beam with meshtastic pre-installed, which I do not, look for the settings menu for meshtastic stack and let us know if there are settings for encryption in there. If not then we have to flash the meshtastic stack ourselves based on what installers are available, apk, binaries or compile from source. T-beam may have a sd card slot or it may require a usb flash tool.
In the latter case here is what you’d need to know!
1) https://meshtastic.org/docs/software/settings/channel#set-encryption
2) https://meshtastic.org/docs/software/device/device-channels
The top link is worthwhile reading first if you have t-beam hardware in your hands… keep us posted. Thanks in advance.
For those interested in profit driven products check ATAK.
https://meshtastic.org/docs/software/plugins/range-test-plugin
I found meshtastic has a range-test-plugin for you in the above link for you to get a range map layer api compliments of meshtastic devs. So, distance from nearest mesh node can be seen as it relates to the furthest range of all mesh nodes. A lot can be done in much less time and no cost using meshtastics framework.